Thinking About Building Your Website? Page4.Me Has Got All The Blocks You Need

Being fluent in more than just one language is an advantage. Speaking your mother tongue and English is almost a prerequisite today. Add to that any other language and your value grows. But there is one limitation with spoken languages- their use is dependent on your geolocation. On the other hand, any kind of programming language is not. Programming and coding languages and environments are universal, so building up something from them is universal as well. However, a lot of people don’t “speak” those languages and they need some kind of product that helps them do the tasks that would normally require some coding. For example, creating a web page. Don’t fret, because for this particular case, there is Page4.Me.
For Starters
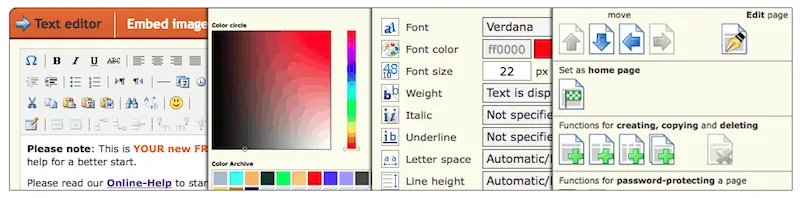
 If you are a bit of advanced user, skip this, but if you are a beginner, or you have that particular family member or cousin that knacks you about their home website, proceed. Page4.Me is a free website designer tool that requires zero knowledge or resources about building a website. Working on a principle of “customise a template”, it is idiot proof tool, that will help you to build your website in no time. After some time, if you want to expand your web storage, remove ads, get support and other things, there are three more packages that will cost 1, 4 or 8 dollars a month, accordingly to their offering. But lets start talking about building your web page. After the usual confirming your registration via e-mail, all you need is to log in, choose the name for your page and you can start working. In the “Design settings” part first two options are about choosing your template that you can later on tweak. “Layout quick select” will allow you to scroll through all templates, and the “Select layout” will allow you to browse through them in categories that are structured by, well, structure. In the “Edit layout” section you can choose between layout and colour presets and if you want to go a bit further you can press “Edit…” button where you can adapt width, margins and heights of sidebars, header and footer. There is no “Save” or “Cancel” buttons, but there are “Commit…” and ”Discard…” buttons, so don’t panic. Next stop is “Font selection” which is self-explanatory and you can edit font for every part of your website there. “Navigation design” will allow you to design parts where other people will navigate themselves on your website to other pages of your website. Last part here are “Design options” where a bit more boring stuff is placed like setting up border width and padding or element distances are set. However, don’t skip it or your website could look crowded or too spaced.
Set Up Even More
 Moving on to the next part are “Website settings”. “Statistics” will of course show statistics of your website, and “General settings” in their “General” area will allow you to optimise your website for SEO. There you can edit title, name of the author, write a description and define keywords. “Advanced” has options like prohibiting right-clicking, defining your timezone, setting a password for certain pages if you want and so on.If you are feeling a bit advanced, there is “Footer” area where you can enter HTML code for your footer, but if you don’t know what this is, you can probably live without it. “Page manager” part will allow you to set up your pages and their settings which is a bit infusing if you don’t know how will your page be set up, but once you get a grip, it will be easy to work with. “Image manager” allows you to upload and manage images for your website. “Upgrade premium” and “Customer account” parts help you with managing and upgrading your account.
Add Some Meat On Those Bones
 And now that you set up your page, you will probably want to put some content in it, no? Well, that is easier than you thought. As you work on your website, all of your changes will be on display on your admin panel, meaning that you will see all of your changes instantly. If you hover above certain part of your website, a small icon will show immediately in the upper left corner. You can edit existing content in your elements delete them, add new ones, move them around or copy them. Part that we skipped on purpose is “Blog settings” because some people do not want to write a blog. If you do, there you can add new posts, manage comments, define blog settings and navigation (that are very similar to all previously mentioned settings), set up design settings and manage your RSS feed. And when you are done, there is no publishing your page, it is already online. If you don’t want anyone to see any of your changes as you do in your admin page, there is an option to display “under construction page”, but we’ll leave that to you to find out where it is (hint: website settings). Just like this tutorial, Page4.Me is a self explanatory tool for building up your website that is extremely easy to use. However if you are advanced user, you will probably want something a bit more challenging. But if you have no clue where to start, this is your starting point.