Join.Me – Tutorial To Your Online Meeting & Screen Sharing

Were you ever in need to have a face-to-face meeting but you weren’t in the same room, or country? Maybe other ways of communicating proved to be slow or unreliable, or incompatible with your OS? There is a solution to your problem. Join.me is one that is easy and quick.
I used the free trial version that lasts for 14 days, but you can prolong that time for 7 extra days, but a bit later about that. First of all, there is always a registration. It is easy and painless. You just need to provide e-mail and password. Then go to your e-mail to click on the verifying link in the mail that you’ve got, and voila – you’re ready to explore.
Starting Out
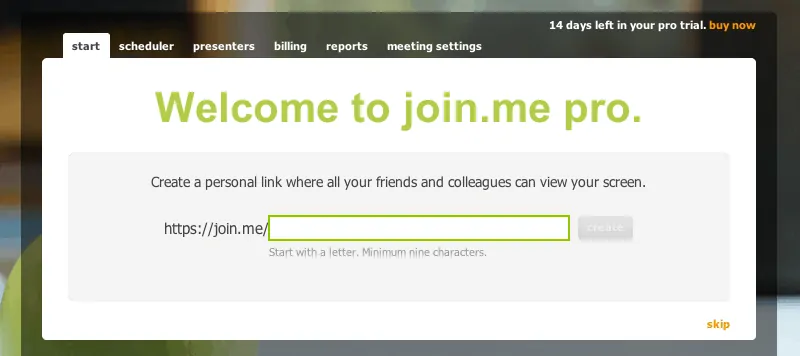
After you log in, which happens automatically when you click verifying link in the email, you’ll go to the start tab. There you’ll need to provide name for a personal link that communication will go through. It will inform you if the name is taken. After that you’ll have four more starting points that you’ll be able to fill with information or skip entirely. I recommend filling at least the second one because when you fill your name, surname, company name etc., you’ll get 7 extra days for using the trial version.
 Other things that you can do here are as following:
- You can share join.me with other people by inviting them. You can type the email of your colleague and click invite.
- You can customize your background, i.e. upload a picture that will display in the background.
- You can schedule a meeting.
Scheduling a meeting
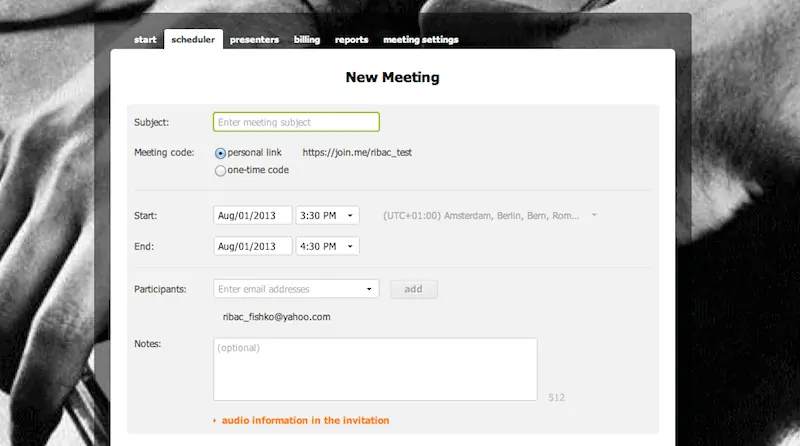
When you want to schedule a meeting you need to click on the second tab called ”scheduler”. Two sub tabs are ”upcoming” and ”history” that are self explanatory. After you click ”schedule a meeting” it opens a new card. There you enter meeting subject (i.e. name of the meeting), start and end time of the meeting (choose time zone so you don’t confuse international attendants of the meeting), add participants by adding their emails and add notes.
Two things that I skipped here are audio information in the invitation and meeting code. At audio information, you can pick variety of states with their country codes. At meeting code you can choose to have your meeting over personal link that you created at the start, or via one time code. In the end, you can choose to create, save as a draft, or discard a meeting. After that you meeting will appear at ”upcoming” tab. There you can start it, duplicate it (which is nifty if you’ll have a second meeting with one different thing), or cancel it.
Other tabs
After that, ”presenter” tab allows you to invite more presenters to your meeting. ”Billing” tab is the one where you deal with payment of the app if you want to go further than trial time. ”Reports” tab is just for that. You can choose to have report from today or up to any date range you want. You’ll get data such as subjects, meeting codes, start times, duration, features used etc. As an account holder, you can see the reports on all presenters in your account or you can choose to report only on your meetings. After that you can export it to Excel or CSV.
Meetings
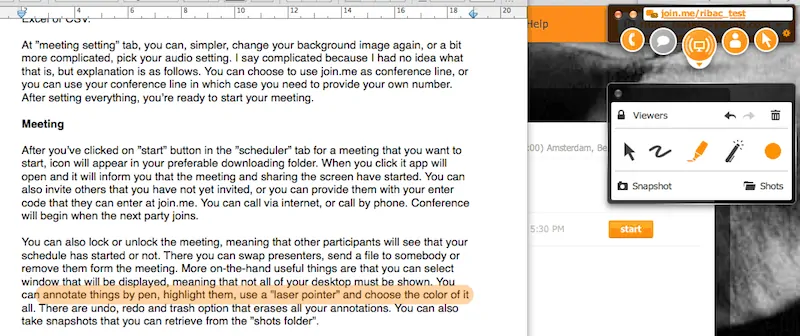 After you’ve clicked on ”start” button in the ”scheduler” tab for a meeting that you want to start, icon will appear in your download folder. When you click it, an app will open and it will inform you that the meeting and sharing the screen have started. You can also invite others that you have not yet invited, or you can provide them with your enter code that they can enter at Join.Me. You can call via internet by phone. The conference will begin when the next party joins.
You can also lock or unlock the meeting, meaning that anyone can see your meeting or only chosen participants. There you can swap presenters, send a file to somebody or remove them form the meeting. More on the-hand useful things are that you can select window that will be displayed, meaning that not all of your desktop must be shown.
You can annotate things by pen, highlight them, use a ”laser pointer” and choose the color of it all. There are undo, redo and trash option that erases all your annotations. You can also take snapshots that you can retrieve from the ”shots folder”.
Other people participation
You can pass the presenter role to somebody else, or share mouse control. At any time you can pause sharing your screen and then resume it. After you exit the session, and when you try to exit join.me, it will ask you to save your account info on this computer.
Although there are a lot of options to do with Join.me, they are easy to use, visually simple and easy to find. Connection was stabile and there were no glitches. And if this tutorial wasn’t enough, there is always their knowledge base with a lot of information on how-to-do something.