CPanel Guide To Your Domain Settings (Subdomain, Alias) for Dummies

Let’s imagine you have been regularly reading all our branding advice on the blog, and so it happens that they have inspired you to create your own website. To a newbie, all the options and possibilities when it comes to creating a website might be a bit overwhelming. No reason to panic though, we are here to help you out. 🙂
First things first. Whether you’re a solopreneur, a small business or anyone planning to build an effective website and a business online, it’s best to go with a flexible web hosting solution after registering a domain name. Running a website smoothly requires storage and bandwidth resources, as well as various advanced permissions for handling files, email accounts, and domains to begin with.
This is where cPanel steps in.
What is cPanel anyway?
Many hosting services use cPanel, a Linux based web hosting control panel that provides a graphical interface and automation tools designed to simplify the process of hosting a web site.
There are different cPanel installations which include different features. Luckily, cPanel is intuitive with an easy-to-navigate dashboard and there’s nothing too technical about it. Also, cPanel improvements, security measures, and updates are done regularly. This is an additional reason why web hosting companies make it available to their clients.
You will need to access cPanel if you want to set up your Google Apps account, complete an easy install of WordPress, galleries, and other CMSs or track errors. These and many more operations are available through different modules that you can see in the dashboard, including Files, Preferences, Databases, Web Applications, Domains, Email, Metrics, Security, Software, and Advanced modules.
In further paragraphs, we’ll focus on the Domains module. This is one of the basic and most important features as it represents the ability to create subdomains and aliases for your website. Let’s see how that is done. 🙂
Find the Domain Section
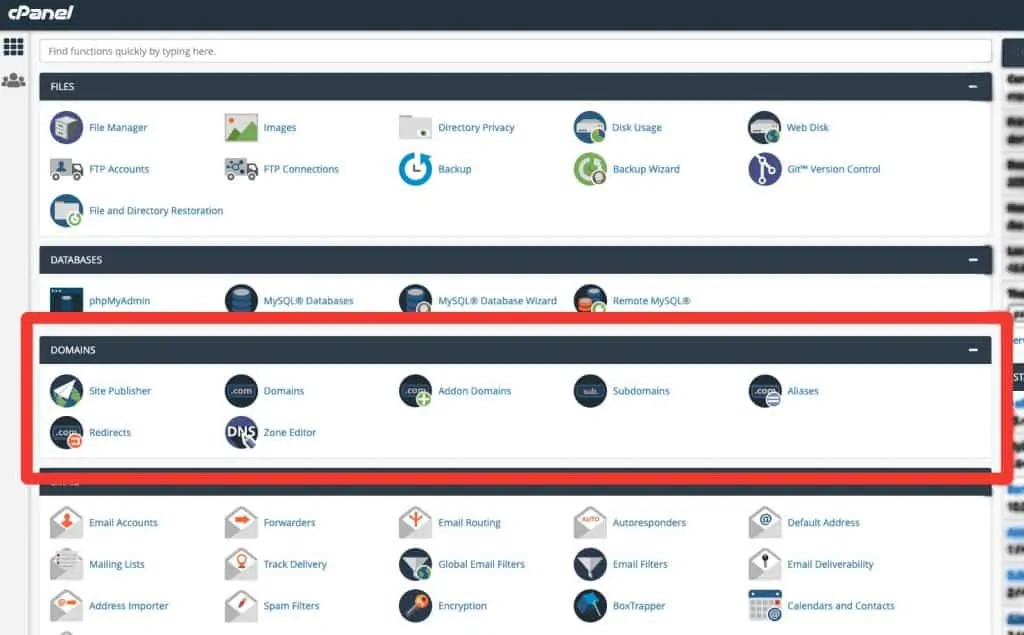
This is what cPanel actually looks like. Section “Domains” is your go-to-place if you want to manage your existing domain(s), add new ones, set up subdomains and redirects from a single hosting account.
There are several parts within this module, but the three most important ones are:
- Subdomains
- Addon Domains
- Aliases (Parked Domains)
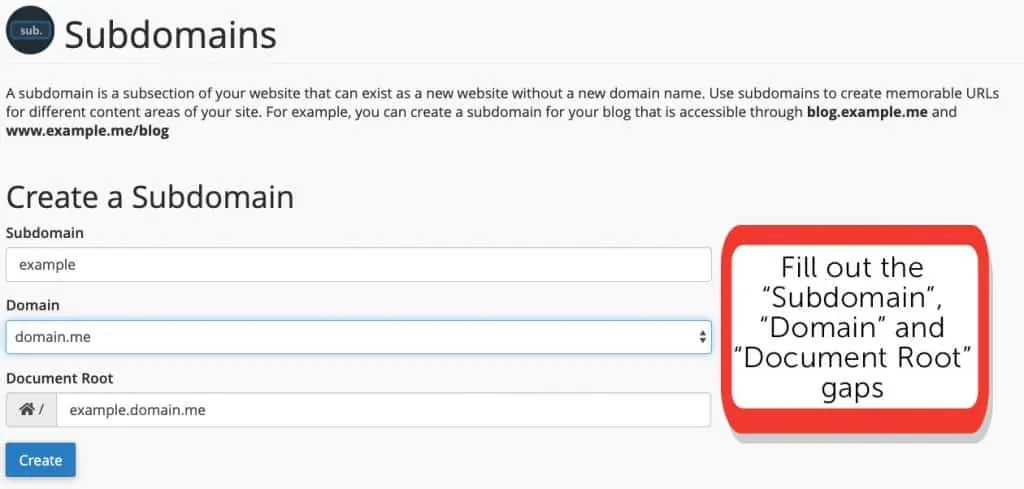
1. Create Your Subdomains
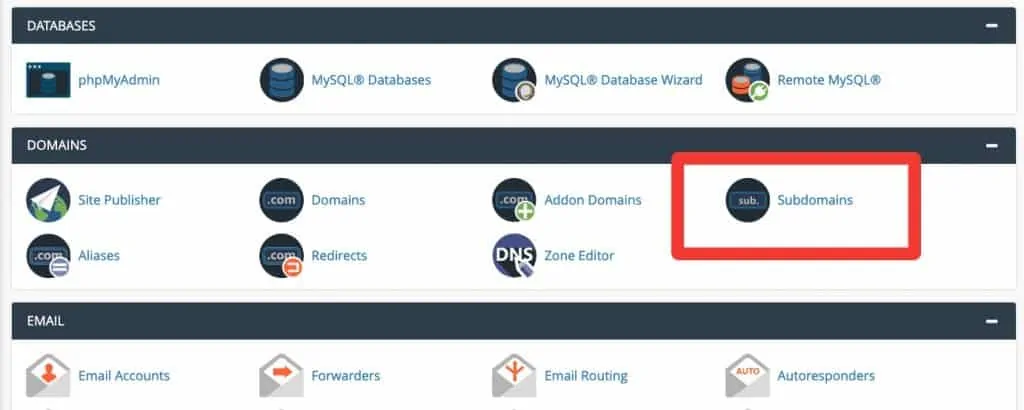
This area of cPanel allows you to create and manage subdomains. Subdomains prefix to your domain name and point to a subdirectory within your public_html folder. Simply choose a name and a corresponding main domain and create your subdomain. It will be a normal subfolder so whatever you put there via FTP will show up when the browser is pointed towards a subdomain.
Subdomains are a great, fast and cost-saving way of creating additional websites because you don’t need to register an additional domain name. They are usually used to expand specific areas of your website such as a forum, blog, shop, etc. and if you use them properly they can have great benefits for your business.
Read more: What Are Subdomains and How do They Affect Search Engine Optimization
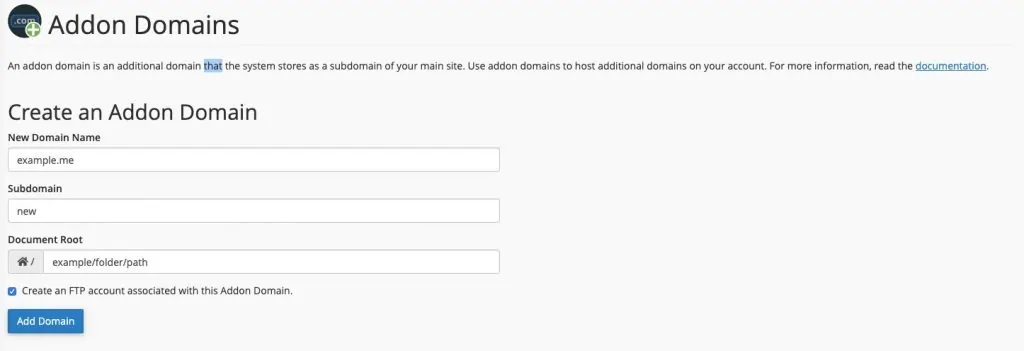
2. Manage Addon Domains

These features pertain to Addon domains a.k.a. the different domain names that share your hosting plan. This feature is something that hosts might not allow you to have due to the fact that you could run several seemingly unrelated websites under the price of one hosting. Some hosts do allow them, but for an extra cost.
If you want to run several websites, this is usually a cheaper option compared to buying dedicated serves for the sites or separate hostings. For most users who simply want to run a personal site (blog or portfolio site), this is probably the best option.
The creation of a new Addon domain is really simple – just enter the second domain name to create a new one. Subdomains of an Addon Domain are relative to your account’s home directory. For security reasons, be mindful to create a strong password, or consider using an automatic generator tool (works very well!).
3. Aliases = Parked Domains

Clicking on this icon opens up the ability to create and manage parked domains which function as pointing devices. They will redirect whoever uses them to the main domain automatically.
Parked Domains (Domain pointers) allow you to “point” or “park” additional domain names to your existing hosting account. This will allow users to also reach your website when entering the “parked” or “pointed” domain into their browsers.
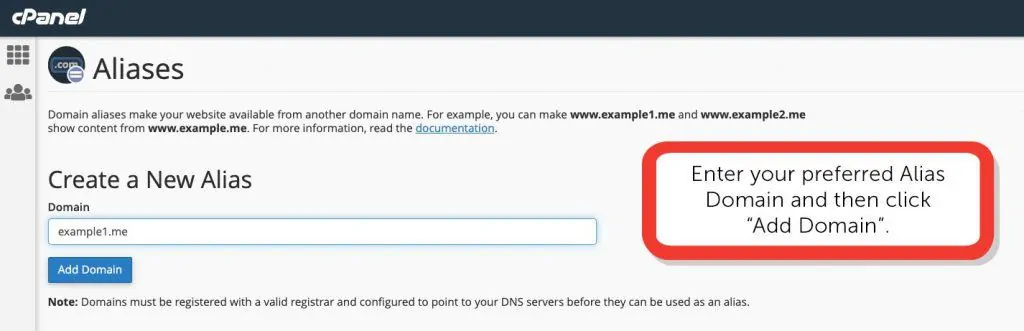
Let’s look at the following example: you might own a domain name anna.me as well as annasmith.me. You consider anna.me to be your main domain, but you want the second domain name to work as well. You do not need to run two websites, with the option of parked domains anyone who uses annasmith.me will end up on the main site.
One more thing before you go…
You don’t have to stick to just one domain extension when launching a new brand (no matter if it’s a business or a personal one). In fact, a good practice is to register all major generic top-level domains – such as .COM, .ME, .NET etc. for brand protection. Some brands also get new TLDs when they want to prevent someone from connecting that domain (or word) with their brand in the future.
Take PayPal for example. If you try typing PayPal.NET or PayPal.ORG you will end up at their main website, PayPal.COM. Not only this but if you type PayPal.ME you will land on your personal link for getting paid instantly. This leading online payments system shows us how to think ahead and use domains wisely – for both brand protection and the extension of the business.
So, now that you have all the basic knowledge on the available options regarding the domain names tied to your brand, we encourage you to take a step forward to a better professional future. Good luck! 🙂
Editor’s Note: This blog post was originally written in July 2013. Some things have changed since then, so we decided to update the post accordingly.